How to Login & Monitor Cameras Using Ivideon App?
In today’s fast-paced world, ensuring the safety and security of your property—be it your home, office, or business—is more important than ever. Video surveillance is an effective way to monitor your space in real-time, providing peace of mind when you’re away. One of the leading cloud-based video surveillance solutions available today is Ivideon, an app designed to make camera monitoring easy, accessible, and efficient.
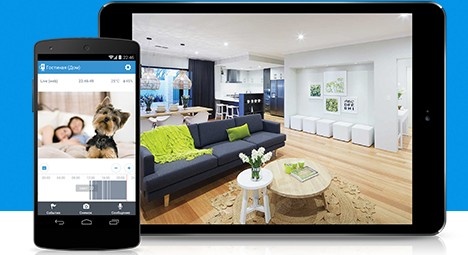
Ivideon is an intuitive and powerful tool that allows users to view live camera feeds, review recorded footage, and receive real-time alerts for suspicious activity. Whether you are using a single camera at home or managing a multi-camera network for a large business, Ivideon enables you to monitor your cameras from anywhere in the world with ease.
In this comprehensive guide, we will show you how to login to the Ivideon app, how to monitor cameras using Ivideon, and how to leverage its various features to enhance your surveillance system. By the end of this guide, you'll be equipped to manage your cameras effectively using the Ivideon app.
What is Ivideon?
Before diving into how to log in and monitor cameras using the Ivideon app, let’s quickly define what Ivideon is and what makes it a popular choice for video surveillance.
Ivideon is a cloud-based surveillance service that offers remote video monitoring, real-time alerts, cloud storage, and secure video recording for security cameras. Whether you're using IP cameras, DVRs, or NVRs, Ivideon supports a wide range of devices and offers a unified platform to manage your video surveillance.
Key Features of Ivideon:
Live Video Monitoring: Watch live feeds from your cameras from any location with an internet connection.
Cloud Storage: Automatically store recordings in Ivideon’s secure cloud storage, ensuring your footage is always accessible.
Push Notifications: Receive instant alerts when motion is detected, or any suspicious activity occurs.
Multi-Camera Support: Manage multiple cameras from different locations with ease.
Device Compatibility: Ivideon is compatible with a variety of cameras, mobile devices, and operating systems, including Android, iOS, Windows, and macOS.
Secure Data: Ivideon uses end-to-end encryption to protect your video footage, ensuring your surveillance data is safe from unauthorized access.
With these features in mind, Ivideon is a versatile and user-friendly option for anyone looking to enhance their surveillance system. Let’s take a closer look at how you can login and monitor your cameras using Ivideon.
Steps to Download & Login to the Ivideon App
1. Download the Ivideon App
Before you can log in to Ivideon, you need to have the Ivideon app installed on your device. Ivideon is available for both mobile devices (iOS and Android) and desktop computers (Windows and macOS).
For Mobile Devices: Go to the App Store (for iOS) or Google Play Store (for Android) and search for Ivideon. Download and install the app.
For Desktop Computers: You can download the Ivideon Server software for Windows or macOS from the Ivideon website and follow the installation process.
Once the app is installed, open the Ivideon app to proceed with the login process.
2. Create an Ivideon Account (If You Don’t Have One)
To use Ivideon, you need an Ivideon account. If you don’t have one, you’ll need to create it. Here’s how you can do that:
Open the Ivideon app and click on the Sign Up button.
Provide the required information, including your name, email address, and a secure password.
Confirm your account by clicking on the verification link sent to your email.
Once verified, go back to the Ivideon app and proceed with the login.
3. Log In to the Ivideon App
After you’ve created an account, you can log in to the Ivideon app:
Open the Ivideon app on your device.
Enter your email address and password that you used during the sign-up process.
Click the Login button.
Once logged in, you’ll be taken to the main dashboard where you can manage your cameras and monitor feeds.
How to Monitor Cameras Using Ivideon App?
After successfully logging in to the Ivideon app, you can begin monitoring your cameras. The Ivideon app offers a range of features designed to make monitoring easy and efficient. Below is a detailed guide on how to monitor your cameras using Ivideon:
1. View Live Camera Feeds
Once logged in, the Ivideon app will display a list of all the cameras that have been added to your account. To monitor a camera live:
From the Dashboard, click on the camera you want to view.
The live video feed will appear on your screen. You can enlarge the feed to full-screen mode by clicking the Full-Screen icon.
Ivideon automatically adjusts the video quality based on your internet connection to ensure smooth viewing.
Tips for Monitoring Live Feeds:
Multiple Cameras: If you have multiple cameras, you can toggle between them to view their live feeds. Ivideon allows you to monitor several cameras simultaneously from the same device.
PTZ Control: For cameras with PTZ (Pan-Tilt-Zoom) capabilities, you can control the camera’s movement directly from the Ivideon app. Simply click on the PTZ controls (arrows and zoom buttons) to adjust the view.
2. Access Recorded Footage
Ivideon stores recorded footage in its cloud storage, allowing you to access past video recordings. To view recorded footage:
Go to the Archive section of the Ivideon app.
Select the date and time range for the footage you want to view.
Choose the camera you want to view footage from and click on it.
The video will start playing from the selected time, and you can use the playback controls to pause, rewind, or fast-forward through the footage.
Searching for Specific Events:
Ivideon makes it easy to find specific events within recorded footage. You can search for events like motion detection, alarms, or scheduled recordings using the search filters provided in the app.
3. Set Up Motion Detection and Alerts
One of the key features of Ivideon is motion detection. You can configure your cameras to send alerts when they detect movement. Here’s how to set it up:
Open the Settings for the camera you want to configure.
Look for the Motion Detection option and enable it.
Adjust the sensitivity level to determine how much movement is required to trigger the alert.
Set up notifications by selecting Push Notifications or Email Alerts. You will be notified instantly if the camera detects any suspicious movement.
Fine-Tuning Motion Detection:
If your camera is located in a busy area, you may want to adjust the sensitivity of the motion detection to avoid false alarms. For areas with little movement, increase the sensitivity to catch even the smallest disturbances.
4. Control and Adjust Camera Settings
Ivideon allows you to adjust various settings for your cameras directly from the app. These settings include:
Video Quality: You can change the video resolution and frame rate to suit your network bandwidth.
Audio Settings: For cameras with built-in microphones, you can enable or disable the audio feed.
Time and Date Settings: Adjust the time zone and ensure the timestamps on your recordings are accurate.
Notifications: Choose how and when you want to receive notifications based on motion or activity.
To adjust these settings, simply navigate to the camera’s Settings section within the Ivideon app.
5. Share Camera Access with Others
If you want to allow other people to monitor your cameras, Ivideon lets you share camera access. Here’s how you can do it:
Go to the Settings for the camera you wish to share.
Look for the Share option and select it.
You can then send an invitation via email, allowing others to access the camera feed either with full or limited permissions.
This feature is especially useful for businesses where multiple employees need to monitor the cameras, or for families who want to share security footage with other members.
6. Accessing Cameras from Multiple Devices
Ivideon allows you to access your cameras from various devices, whether you’re on your phone, tablet, or PC. You can:
Switch Between Devices: If you're using Ivideon on your phone and need to switch to your computer, simply log in to your Ivideon account on the new device, and all your cameras and settings will be synced.
Manage Multiple Locations: Ivideon’s multi-location support allows you to manage cameras from different properties in a single account. If you have cameras installed in various places, you can monitor all of them from the Ivideon app.
7. Use Ivideon’s Web Portal for Advanced Monitoring
In addition to the Ivideon mobile and desktop apps, you can also monitor your cameras using Ivideon’s web portal. Simply log in to your Ivideon account via any browser, and you’ll have full access to your cameras, recordings, and settings. The web portal offers additional features for bulk camera management and advanced configurations.
Conclusion
Monitoring your cameras with Ivideon is straightforward and flexible, offering an intuitive interface and powerful features to keep your property secure. By following the steps in this guide, you can easily login to the Ivideon app, access live feeds, review recorded footage, and set up motion detection alerts for enhanced security. Whether you are using Ivideon for personal use or business, its cloud-based solution allows you to monitor your cameras from anywhere, at any time.
With Ivideon, you can be confident that your video surveillance system is secure, reliable, and accessible at all times.
Trending Now

Updates